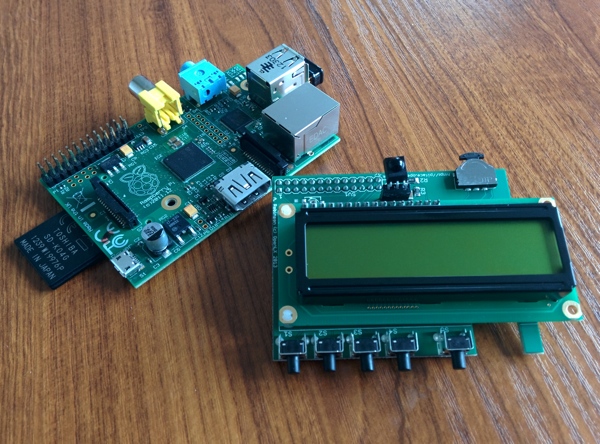
The Hackspace recently took delivery of a PiFace Control and Display board from Farnell. It is an add-on board for the Raspberry Pi that includes a 16 character by 2 line display, five push buttons, a toggle button and an IR receiver. The intention is to use this on the Hackspace 3D printer to display some information about the printer (bed and extruder temperatures) and about the job (percent complete). It would also be nice to use the buttons to control some of the functions of the printer such as priming the extruder.
In this post I’ll cover what I did to get up and running with the PiFace. This was really just a learning exercise to understand how it works and what can be done. There will be another post about getting it working with the 3D printer later on.
Getting The Raspberry Pi Ready
There is a nice guide on getting everything setup on the PiFace website so I won’t go into every detail again. In short:
- Updated the Raspbian install on our Raspberry Pi by running
apt-get update && apt-get upgradeThis took some hours, must have been quite a while since we did it! - Enabled SPI using
raspi-config. What this actually seems to do is make sure the spi kernel module is installed.
pi@raspberrypi ~ $ lsmod |grep spi
regmap_spi              1897  1 snd_soc_core
spi_bcm2708             4728  0
- Installed the PiFace Python modules
apt-get install python3-pifacecad. It’s nice that it is included in the Raspbian repos and can be installed so easily.
First Test
The best idea is always to test using some code written by someone else so that you know you have everything setup correctly. Fortunately there is a nice sysinfo sample provided.
pi@raspberrypi ~ $ python3 /usr/share/doc/python3-pifacecad/examples/sysinfo.py
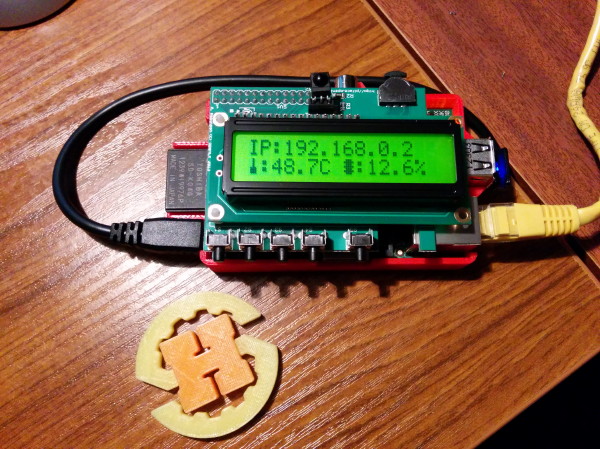
That works perfectly. Time to dive into python and see what the api is like.
Hello World Using The Python Shell
pi@raspberrypi ~ $ python3
Python 3.2.3 (default, Mar  1 2013, 11:53:50)
[GCC 4.6.3] on linux2
Type "help", "copyright", "credits" or "license" for more information.
>>> import pifacecad as p
>>> cad = p.PiFaceCAD()
>>> cad.lcd.backlight_on()
>>> cad.lcd.write("Hello World!")
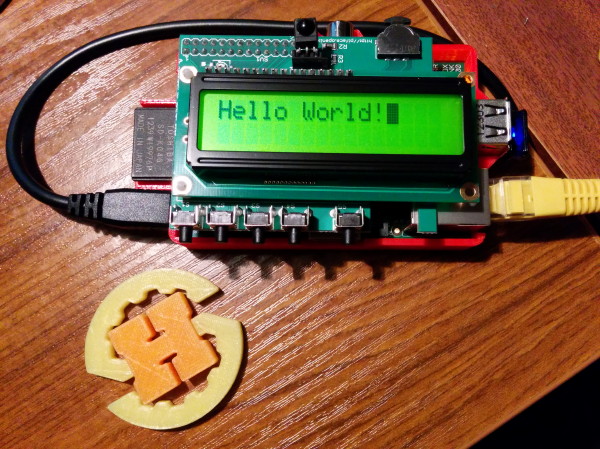
Pretty simple! It took me much longer than this to get one of these displays working on Arduino the first time I tried it. But a lot of that was sorting out the wiring! Thats one good reason to get a PiFace instead of wiring up your own display.
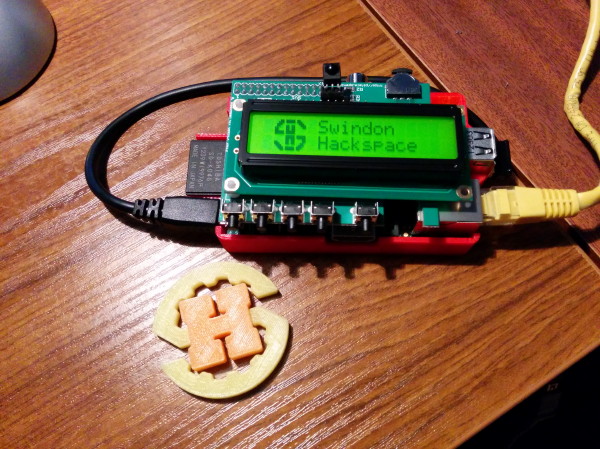
Something A Bit Fancier
Ok, let’s try something a bit more tricky. There are api commands to move the cursor around and to hide the cursor, so let’s have a go with those.
pi@raspberrypi ~ $ python3
Python 3.2.3 (default, Mar  1 2013, 11:53:50)
[GCC 4.6.3] on linux2
Type "help", "copyright", "credits" or "license" for more information.
>>> import pifacecad as p
>>> cad = p.PiFaceCAD()
>>> cad.lcd.backlight_on()
>>> cad.lcd.clear()
>>> cad.lcd.set_cursor(5,0)
>>> cad.lcd.write("Swindon")
>>> cad.lcd.set_cursor(5,1)
>>> cad.lcd.write("Hackspace")
>>> cad.lcd.cursor_off()
>>> cad.lcd.blink_off()
A few points to note here. For the non-programmers out there, computers count from zero, so “5” is actually the 6th position along and “0” is the first row. Interesting that you have to call both cursor_off() and blink_off() to totally get rid of the cursor, but that could be useful in certain situations.

Custom Bitmaps
It would be nice if I could get the Swindon Hackspace logo on there too using the custom bitmap support. From the documentation it doesn’t look too difficult, there is a page for generating the codes to create characters that is linked to from the documentation. If you’re familiar with setting bits in bytes it’s fairly easy to see what is going on; if you want the right most pixel to be on, add 1, the second from the right, add 2, third from the right add 4, fourth from the right, add 8, fifth from the right add 16. Do this for each line and you have the 8 values you need to pass into the LCDBitmap() function.
However there isn’t really enough room to get the hackspace logo in a single character so let’s try using more than one. No mention of how many custom characters you are allowed in the PiFace docs, but the designer page about the HD44780 says you can have up to eight. If we had 3×2 that would give us (5+5+5) x (8+8) = 15×16 pixels to play with. That’s a nice square-ish shape and uses 6 custom characters so could work.
I created a new image in Gimp that is 15×16 pixels, zoom in to 1600% and started designing by filling in pixels. I then “split” this into six by using the select tool to draw round each group of 5×8 pixels and copied it into the online designer to generate the codes. Lazy I know, I could work out those numbers myself!
My first attempt didn’t look so great because of where the physical gaps between the characters on the display fell, but a bit of tweaking and I ended up with something like this:
>>> sh = p.LCDBitmap([3,7,14,12,24,24,31,31])
>>> cad.lcd.store_custom_bitmap(0, sh)
>>> sh = p.LCDBitmap([31,31,0,27,27,27,31,31])
>>> cad.lcd.store_custom_bitmap(1, sh)
>>> sh = p.LCDBitmap([24,28,14,7,3,0,0,0])
>>> cad.lcd.store_custom_bitmap(2, sh)
>>> sh = p.LCDBitmap([0,0,0,24,28,14,7,3])
>>> cad.lcd.store_custom_bitmap(3, sh)
>>> sh = p.LCDBitmap([31,31,27,27,27,0,31,31])
>>> cad.lcd.store_custom_bitmap(4, sh)
>>> sh = p.LCDBitmap([31,31,3,3,6,14,28,24])
>>> cad.lcd.store_custom_bitmap(5, sh)
That code loads six custom characters into memory locations zero to five. Now all we need to do is write them out to the display. It might be wise to turn the cursor back on at this point to see where we are writing to:
>>> cad.lcd.cursor_on()
>>> cad.lcd.blink_on()
>>> cad.lcd.set_cursor(1,0)
Note that the cursor doesn’t reappear until you move it somewhere. Time to write out the logo and finally hide the cursor again.
>>> cad.lcd.write_custom_bitmap(0)
>>> cad.lcd.write_custom_bitmap(1)
>>> cad.lcd.write_custom_bitmap(2)
>>> cad.lcd.set_cursor(1,1)
>>> cad.lcd.write_custom_bitmap(3)
>>> cad.lcd.write_custom_bitmap(4)
>>> cad.lcd.write_custom_bitmap(5)
>>>
>>> cad.lcd.cursor_off()
>>> cad.lcd.blink_off()
A pretty pleasing result for an hour of playing around in the Python shell.
Interestingly, if you redefine one of the custom bitmaps by calling store_custom_bitmap()while it is on the display, it changes immediately without you having to rewrite it using write_custom_bitmap(). This could be a neat way to have animated characters. It does mean that you really are limited to the 8 it supports though, and you can’t “cheat” by defining one, writing it to the display and then re-defining it.
Errors
If you do try to access or create more custom bitmaps than you should you get a nice friendly error message, which is good to know. It’s always reassuring that a library is decently written when it provides nice error messages.
>>> cad.lcd.write_custom_bitmap(8)
Traceback (most recent call last):
  File "<stdin>", line 1, in <module>
  File "/usr/lib/python3/dist-packages/pifacecad/lcd.py", line 458, in write_custom_bitmap
	self.char_bank_in_range_or_error(char_bank)
  File "/usr/lib/python3/dist-packages/pifacecad/lcd.py", line 492, in char_bank_in_range_or_error
	cgramaddr=char_bank,
Exception: There are only 8 custom characters (You tried to access 8).

>>> cad.lcd.store_custom_bitmap(8, sh)
Traceback (most recent call last):
  File "<stdin>", line 1, in <module>
  File "/usr/lib/python3/dist-packages/pifacecad/lcd.py", line 474, in store_custom_bitmap
	self.char_bank_in_range_or_error(char_bank)
  File "/usr/lib/python3/dist-packages/pifacecad/lcd.py", line 492, in char_bank_in_range_or_error
	cgramaddr=char_bank,
Exception: There are only 8 custom characters (You tried to access 8).
And Finally…
Given I only know the basics in Python (though I do code in other languages) it’s pretty easy to get started with the PiFace and make it do some cool stuff. It seems like it should be fairly easy to get it doing something useful with the 3D printer. More on that later….
Thanks go to Farnell / Element14 for supplying the PiFace Control and Display board.